Monthly Subscription App using Stripe, Cashier and Laravel 5.4 with example
In this tutorial, You will know how to configure Stripe with Laravel 5.4 and register subscription based user using the Laravel 5.4 Cashier package.
Laravel is the best back-end technology to easily configure stripe payment system.
Install Laravel 5.4 & Cashier using ComposerIn the first step, you will have to setup your Laravel application in your working directory.
Now i will run the following command to install Laravel :
composer create-project --prefer-dist laravel/laravel blog
Above command will create a fresh laravel application. Now we need to configure laravel/cashier package for Stripe in our composer.json file :
.....
"require": {
        .....
        "laravel/cashier": "~7.0"
    },
    ......
Now run composer update command.
Now we need to register service provider Laravel\Cashier\CashierServiceProvider in config/app.php file to the providers array.
....
'providers' => [
    ....,
    Laravel\Cashier\CashierServiceProvider::class,
]
    .....
Create the migrations
By default, you will get a migration file to create a users table so we will need some more columns to the users table and create a new subscriptions table for holding the information of the customer's subscription.
Create a new migration file by using artisan command and add following line of code in that file :
Schema::table('users', function ($table) {
    $table->string('stripe_id')->nullable();
    $table->string('card_brand')->nullable();
    $table->string('card_last_four')->nullable();
    $table->timestamp('trial_ends_at')->nullable();
});

Schema::create('subscriptions', function ($table) {
    $table->increments('id');
    $table->integer('user_id');
    $table->string('name');
    $table->string('stripe_id');
    $table->string('stripe_plan');
    $table->integer('quantity');
    $table->timestamp('trial_ends_at')->nullable();
    $table->timestamp('ends_at')->nullable();
    $table->timestamps();
});
Now you are ready to migrate the database by running following command :
php artisan migrateCreate Stripe Plan
Now to get started with Stripe, we need to create an account first. Once you have created your stripe account then click Plans under Subscriptions.
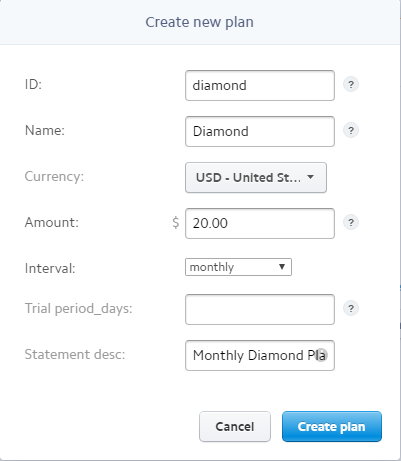
I have created a diamond plan for testing, you can create your own subscription plan.
Now we need to get Stripe API access key to configure Stripe in Laravel and you can get keys from clicking on the API.
Now i will add the stripe key and secret in config/services.php file.
 'stripe' => [
        'model' => App\User::class,
        'key' =>'your_stripe_key',
        'secret' => 'your_stripe_secret',
    ],
Finally i need to add the Billable Trait on User Model.
use Laravel\Cashier\Billable;

class User extends Authenticatable
{
    use Billable;
}
Add Routes
I assume that you have set up the stripe configuration successfully.
Ok let's start with Laravel routes to register a subscription based user.
- Route::get('subscription', ['as'=>'subscription','uses'=>'HomeController@subscription']);
- Route::post('subscription', ['as'=>'post-subscription','uses'=>'HomeController@postSubscription']);
In this step, we will create a HomeController.php in following directory app/Http/Controllers.
- <?php
- namespace App\Http\Controllers;
- use Illuminate\Http\Request;
- use App\User;
- class HomeController extends Controller {
- public function subscription(){
- return view('subscription');
- }
- public function postSubscription(Request $request){
- $user = new User;
- $user->name = $request->name;
- $user->email = $request->email;
- $user->password = bcrypt($request->password);
- $user->save();
- $user->newSubscription('main',$request->subscription)->create($request->token);
- if ($user->subscribed('main')) {
- return response()->json(['msg'=>'Successfully subscribed']);
- }
- return response()->json(['msg'=>'Oops there is something error with your input']);
- }
- }
In above code within postSubscription method, i add a user first then subscribe the user with selected plan.
You will notice that we are getting a token as parameter in "create" method, This token is generated from sensitive card data and you will see in the next step that how it will generate.
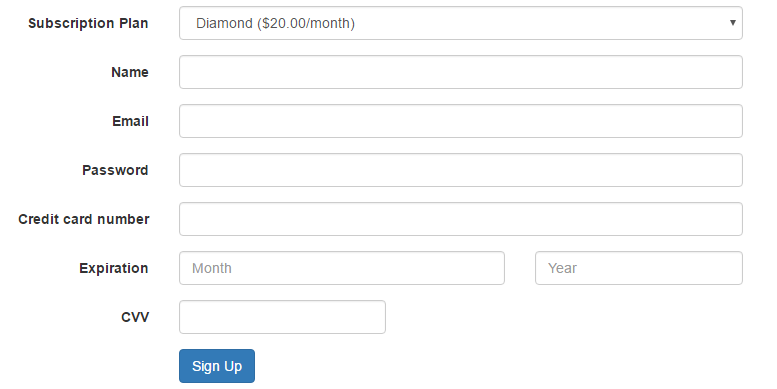
Subscription PageIn this step, we will create a file where users will fill their details, to subscribe a plan for the application.
- <!DOCTYPE html>
- <html lang="en">
- <head>
- <meta charset="utf-8">
- <meta http-equiv="X-UA-Compatible" content="IE=edge">
- <meta name="viewport" content="width=device-width, initial-scale=1">
- <title>Monthly Subscription App using Stripe, Cashier and Laravel 5.4 with example</title>
- <!-- Styles -->
- <link href="https://maxcdn.bootstrapcdn.com/bootstrap/3.3.7/css/bootstrap.min.css" rel="stylesheet">
- <link rel="stylesheet" href="http://formvalidation.io/vendor/formvalidation/css/formValidation.min.css">
- <script src="https://ajax.googleapis.com/ajax/libs/jquery/1.12.4/jquery.min.js"></script>
- <script src="http://formvalidation.io/vendor/formvalidation/js/formValidation.min.js"></script>
- <script src="http://formvalidation.io/vendor/formvalidation/js/framework/bootstrap.min.js"></script>
- </head>
- <body>
- <div class="row">
- <form id="paymentForm" class="form-horizontal">
- <input type="hidden" name="_token" value="{{csrf_token()}}">
- <div class="form-group">
- <label class="col-xs-3 control-label">Subscription Plan</label>
- <div class="col-xs-5">
- <select name="subscription" class="form-control">
- <option value="diamond">Diamond ($20.00/month)</option>
- </select>
- </div>
- </div>
- <div class="form-group">
- <label class="col-xs-3 control-label">Name</label>
- <div class="col-xs-5">
- <input type="text" class="form-control" name="name" />
- </div>
- </div>
- <div class="form-group">
- <label class="col-xs-3 control-label">Email</label>
- <div class="col-xs-5">
- <input type="email" class="form-control" name="email" />
- </div>
- </div>
- <div class="form-group">
- <label class="col-xs-3 control-label">Password</label>
- <div class="col-xs-5">
- <input type="password" class="form-control" name="password" />
- </div>
- </div>
- <div class="form-group">
- <label class="col-xs-3 control-label">Credit card number</label>
- <div class="col-xs-5">
- <input type="text" class="form-control" data-stripe="number" />
- </div>
- </div>
- <div class="form-group">
- <label class="col-xs-3 control-label">Expiration</label>
- <div class="col-xs-3">
- <input type="text" class="form-control" placeholder="Month" data-stripe="exp-month" />
- </div>
- <div class="col-xs-2">
- <input type="text" class="form-control" placeholder="Year" data-stripe="exp-year" />
- </div>
- </div>
- <div class="form-group">
- <label class="col-xs-3 control-label">CVV</label>
- <div class="col-xs-2">
- <input type="text" class="form-control" data-stripe="cvc" />
- </div>
- </div>
- <div class="form-group">
- <div class="col-xs-9 col-xs-offset-3">
- <button type="submit" class="btn btn-primary">Sign Up</button>
- </div>
- </div>
- <input type="hidden" name="token" value="" />
- </form>
- </div>
- <script src="https://js.stripe.com/v2/"></script>
- <script>
- $(document).ready(function() {
- // Change the key to your one
- Stripe.setPublishableKey('your_stripe_key');
- $('#paymentForm')
- .formValidation({
- framework: 'bootstrap',
- icon: {
- valid: 'glyphicon glyphicon-ok',
- invalid: 'glyphicon glyphicon-remove',
- validating: 'glyphicon glyphicon-refresh'
- },
- fields: {
- name: {
- validators: {
- notEmpty: {
- message: 'The name is required'
- }
- }
- },
- email: {
- validators: {
- notEmpty: {
- message: 'The email is required'
- }
- }
- },
- password: {
- validators: {
- notEmpty: {
- message: 'The password is required'
- }
- }
- },
- ccNumber: {
- selector: '[data-stripe="number"]',
- validators: {
- notEmpty: {
- message: 'The credit card number is required'
- },
- creditCard: {
- message: 'The credit card number is not valid'
- }
- }
- },
- expMonth: {
- selector: '[data-stripe="exp-month"]',
- row: '.col-xs-3',
- validators: {
- notEmpty: {
- message: 'The expiration month is required'
- },
- digits: {
- message: 'The expiration month can contain digits only'
- },
- callback: {
- message: 'Expired',
- callback: function(value, validator) {
- value = parseInt(value, 10);
- var year = validator.getFieldElements('expYear').val(),
- currentMonth = new Date().getMonth() + 1,
- currentYear = new Date().getFullYear();
- if (value < 0 || value > 12) {
- return false;
- }
- if (year == '') {
- return true;
- }
- year = parseInt(year, 10);
- if (year > currentYear || (year == currentYear && value >= currentMonth)) {
- validator.updateStatus('expYear', 'VALID');
- return true;
- } else {
- return false;
- }
- }
- }
- }
- },
- expYear: {
- selector: '[data-stripe="exp-year"]',
- row: '.col-xs-3',
- validators: {
- notEmpty: {
- message: 'The expiration year is required'
- },
- digits: {
- message: 'The expiration year can contain digits only'
- },
- callback: {
- message: 'Expired',
- callback: function(value, validator) {
- value = parseInt(value, 10);
- var month = validator.getFieldElements('expMonth').val(),
- currentMonth = new Date().getMonth() + 1,
- currentYear = new Date().getFullYear();
- if (value < currentYear || value > currentYear + 100) {
- return false;
- }
- if (month == '') {
- return false;
- }
- month = parseInt(month, 10);
- if (value > currentYear || (value == currentYear && month >= currentMonth)) {
- validator.updateStatus('expMonth', 'VALID');
- return true;
- } else {
- return false;
- }
- }
- }
- }
- },
- cvvNumber: {
- selector: '[data-stripe="cvc"]',
- validators: {
- notEmpty: {
- message: 'The CVV number is required'
- },
- cvv: {
- message: 'The value is not a valid CVV',
- creditCardField: 'ccNumber'
- }
- }
- }
- }
- })
- .on('success.form.fv', function(e) {
- e.preventDefault();
- var $form = $(e.target);
- // Reset the token first
- $form.find('[name="token"]').val('');
- Stripe.card.createToken($form, function(status, response) {
- if (response.error) {
- alert(response.error.message);
- } else {
- // Set the token value
- $form.find('[name="token"]').val(response.id);
- // Or using Ajax
- $.ajax({
- // You need to change the url option to your back-end endpoint
- url: "{{route('post-subscription')}}",
- data: $form.serialize(),
- method: 'POST',
- dataType: 'json'
- }).success(function(data) {
- alert(data.msg);
- // Reset the form
- $form.formValidation('resetForm', true);
- });
- }
- });
- });
- });
- </script>
- </body>
- </html>
Using stripe, we do not need to save sensitive card data, we pass these details to the Stripe server and stripe server will return a token if we do not get any error.


.jpg)