Submit Bootstrap Contact Form in PHP Laravel 5 with toastr notifications jquery
In this tutorial, i will tell you how to create simple contact form and on submit apply validation over it in laravel You will get notify with toastr notification on successfully.
As we know, for any organisation contact form comes on first priority because its medium to communicate with site owner.
By using contact form, you can keep records of users who want to connect with you and when you have any updates then easily you can send notification to those users via their email addresses.
Here i will design simple bootstrap contact form having 3 fields : name, email and message.
Step 1: Install Laravel 5.2Before going with below steps, you should configure your local system first. If Laravel is not installed in your local system then first install it by running following command :
composer create-project --prefer-dist laravel/laravel blog
Ok now, i assume it you have successfully installed laravel project in your path directory.
Step 2: Create ContactEmail Table and ModelNow in this step, create a contact_emails table (having column id,name,email,message,created_at,updated_at) in your database and then create model for contact_emails table.
- namespace App;
- use Illuminate\Database\Eloquent\Model;
- class ContactEmail extends Model
- {
- public $fillable = ['name','email','message'];
- }
In this step we will create two routes. First route will render form where you fill your details and second route will be used for posting form data with post method.
Add these two routes in your routes.php file.
Route::get('contact-us',array('as'=>'getcontact','uses'=>'PageController@getContact'));
Route::post('contact-us',array('as'=>'postcontact','uses'=>'PageController@postContact'));
Now we will create a PageController.php in controllers directory.
- <?php
- namespace App\Http\Controllers;
- use Illuminate\Http\Request;
- use App\ContactEmail as ContactEmail;
- class PageController extends Controller {
- public function getContact()
- {
- return view('contact');
- }
- public function postContact(Request $request)
- {
- $this->validate($request, [
- 'name' => 'required',
- 'email' => 'required|email',
- 'message'=>'required'
- ]);
- ContactEmail::create($request->all());
- $notification = array(
- 'message' => 'Thanks! We shall get back to you soon.',
- 'alert-type' => 'success'
- );
- return redirect()->back()->with($notification);
- }
- }
In postContact method, we are validating name,email and message field if any field is empty then it redirect back with errors variable otherwise it create a new record in table and return back with toastr notification.
In this step, we will create a simple bootstrap form for contact us.
resources/views/contact.blade.php
- <!DOCTYPE html>
- <html lang="en">
- <head>
- <meta charset="utf-8">
- <meta http-equiv="X-UA-Compatible" content="IE=edge">
- <meta name="viewport" content="width=device-width, initial-scale=1">
- <title>Submit Bootstrap Contact Form in Laravel 5 using toastr notifications jquery</title>
- <link rel="stylesheet" href="http://www.expertphp.in/css/bootstrap.css" type="text/css" media="all" />
- <link rel="stylesheet" type="text/css" href="//cdnjs.cloudflare.com/ajax/libs/toastr.js/latest/css/toastr.css">
- <script src="http://demo.expertphp.in/js/jquery.js"></script>
- <script src="//cdnjs.cloudflare.com/ajax/libs/toastr.js/latest/js/toastr.min.js"></script>
- </head>
- <body>
- <div class="container">
- <div class="panel panel-primary">
- <div class="panel-heading">Submit Contact Form in Laravel 5 using toastr notifications jquery</div>
- <div class="panel-body">
- {!! Form::open(array('route' => 'postcontact','method'=>'POST')) !!}
- <div class="col-xs-12 col-sm-12 col-md-12">
- <div class="form-group">
- <strong>Name:</strong>
- {!! Form::text('name', null, array('placeholder' => 'Name','class' => 'form-control')) !!}
- {!! $errors->first('name', '<p class="alert alert-danger">:message</p>') !!}
- </div>
- </div>
- <div class="col-xs-12 col-sm-12 col-md-12">
- <div class="form-group">
- <strong>Email:</strong>
- {!! Form::text('email', null, array('placeholder' => 'Email','class' => 'form-control')) !!}
- {!! $errors->first('email', '<p class="alert alert-danger">:message</p>') !!}
- </div>
- </div>
- <div class="col-xs-12 col-sm-12 col-md-12">
- <div class="form-group">
- <strong>Message:</strong>
- {!! Form::textarea('message', null, array('placeholder' => 'Message','class' => 'form-control','style'=>'height:100px')) !!}
- {!! $errors->first('message', '<p class="alert alert-danger">:message</p>') !!}
- </div>
- </div>
- <div class="col-xs-12 col-sm-12 col-md-12 text-center">
- {!! Form::submit('Save',['class'=>'btn btn-success']) !!}
- </div>
- {!! Form::close() !!}
- </div>
- </div>
- </div>
- <script>
- @if(Session::has('message'))
- var type = "{{ Session::get('alert-type', 'info') }}";
- switch(type){
- case 'info':
- toastr.info("{{ Session::get('message') }}");
- break;
- case 'warning':
- toastr.warning("{{ Session::get('message') }}");
- break;
- case 'success':
- toastr.success("{{ Session::get('message') }}");
- break;
- case 'error':
- toastr.error("{{ Session::get('message') }}");
- break;
- }
- @endif
- </script>
- </body>
- </html>
We check in above script if session has any message to display by using Session::has('message') and then apply switch cases over notification what type of alert message should be display via toastr notification.
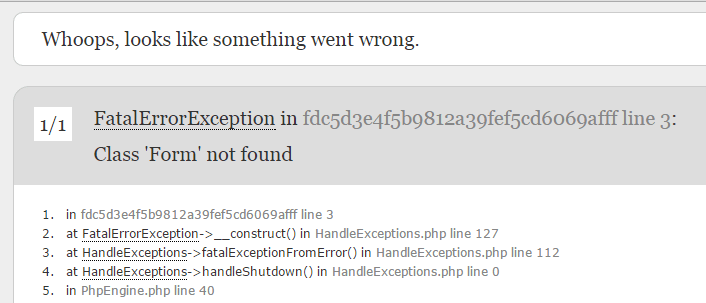
If you will get any error related "Class form or html not found in Laravel 5" then click here to resolve this error.
Class form or html not found in Laravel 5
Now We have completed a simple contact form and save form data into database. We will tell you more about toastr notification in next tutorial.
We hope this tutorial will help you to create simple contact form for your application.


.jpg)