PHP Laravel 5 Intervention image upload and resize tutorial
In this post i will tell you how to resize image in laravel application using Intervention library. You can manipulate and handle PHP image by using Intervention library which is open source. You can take help of this library in your application whenever you need thumbnail image or want to resize after uploading images in PHP Laravel.
Benefits of including library intervention/image in your Laravel application, it maintain the image quality that means you can easily resize your images without losing quality.
You will have to simply follow this step to use intervention/image library in your application.
Here in this example, I define a form to submit and on submit i resize images and move them in destination folder with original image too.
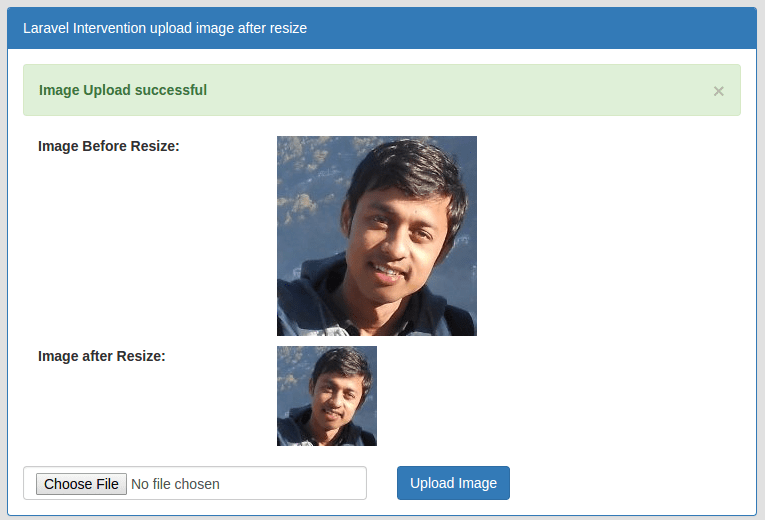
It will display both images after successfully moved in target folder.
Step 1: InstallationIn this step you will have to configure intervention/image library in your application.
You will have to run below command in your terminal promt.
composer require intervention/image
Now i assume that you have successfully installed by above command.
OK, now i will configure service provider with their aliases name in following path config/app.php .
config/app.phpAdd this service provider in provider array :
'Intervention\Image\ImageServiceProvider'
Now add facade to aliases array.
'Image' => 'Intervention\Image\Facades\Image'Step 2: Add Route
In this step add routes to handle request in following path app/Http/routes.php
app/Http/routes.php
- Route::get('intervention-resizeImage',['as'=>'intervention.getresizeimage','uses'=>'FileController@getResizeImage']);
- Route::post('intervention-resizeImage',['as'=>'intervention.postresizeimage','uses'=>'FileController@postResizeImage']);
In this step add FileController for handling and manipulate image.
app/Http/Controllers/FileController.php
- <?php
- namespace App\Http\Controllers;
- use Illuminate\Http\Request;
- use App\Http\Controllers\Controller;
- use Image;
- class FileController extends Controller {
- public function getResizeImage()
- {
- return view('files.resizeimage');
- }
- public function postResizeImage(Request $request)
- {
- $this->validate($request, [
- 'photo' => 'required|image|mimes:jpeg,png,jpg,gif,svg|max:1024',
- ]);
- $photo = $request->file('photo');
- $imagename = time().'.'.$photo->getClientOriginalExtension();
- $destinationPath = public_path('/thumbnail_images');
- $thumb_img = Image::make($photo->getRealPath())->resize(100, 100);
- $thumb_img->save($destinationPath.'/'.$imagename,80);
- $destinationPath = public_path('/normal_images');
- $photo->move($destinationPath, $imagename);
- return back()
- ->with('success','Image Upload successful')
- ->with('imagename',$imagename);
- }
- }
In postResizeImage method we validate file as image type with max file size.
getRealPath() method is used take a file from the form request.
You will notice that i move image in two directory within public folder so you will first create this directory in your public folder.
- thumbnail_images
- normal_images
If files is not writable then give permission to folder.
Step 3: Blade fileNow in this step you will create resizeimage.blade.php in following path resources/views/files/resizeimage.blade.php
- @extends('layouts.default')
- @section('content')
- <div class="panel panel-primary">
- <div class="panel-heading">Laravel Intervention upload image after resize</div>
- <div class="panel-body">
- @if (count($errors) > 0)
- <div class="alert alert-danger">
- @foreach ($errors->all() as $error)
- <p class="error_item">{{ $error }}</p>
- @endforeach
- </div>
- @endif
- @if (Session::get('success'))
- <div class="row">
- <div class="col-md-12">
- <div class="col-md-4">
- <strong>Image Before Resize:</strong>
- </div>
- <div class="col-md-8">
- <img src="{{asset('normal_images/'.Session::get('imagename')) }}" />
- </div>
- </div>
- <div class="col-md-12" style="margin-top:10px;">
- <div class="col-md-4">
- <strong>Image after Resize:</strong>
- </div>
- <div class="col-md-8">
- <img src="{{asset('thumbnail_images/'.Session::get('imagename')) }}" />
- </div>
- </div>
- </div>
- @endif
- {!! Form::open(array('route' => 'intervention.postresizeimage','files'=>true)) !!}
- <div class="row">
- <div class="col-md-6">
- <br/>
- {!! Form::file('photo', array('class' => 'form-control')) !!}
- </div>
- <div class="col-md-6">
- <br/>
- <button type="submit" class="btn btn-primary">Upload Image</button>
- </div>
- </div>
- {!! Form::close() !!}
- </div>
- </div>
- @endsection
Using Laravel Intervention you can easily resize images on the fly.
Click here to see demo how it works..


.jpg)